
How to Choose a Kayak Anchoring System for the Water You Actually Paddle
Compare grapnel, claw, mushroom and stake-out options by bottom, depth and flow, then plan rode, trolley, storage and immediate release.
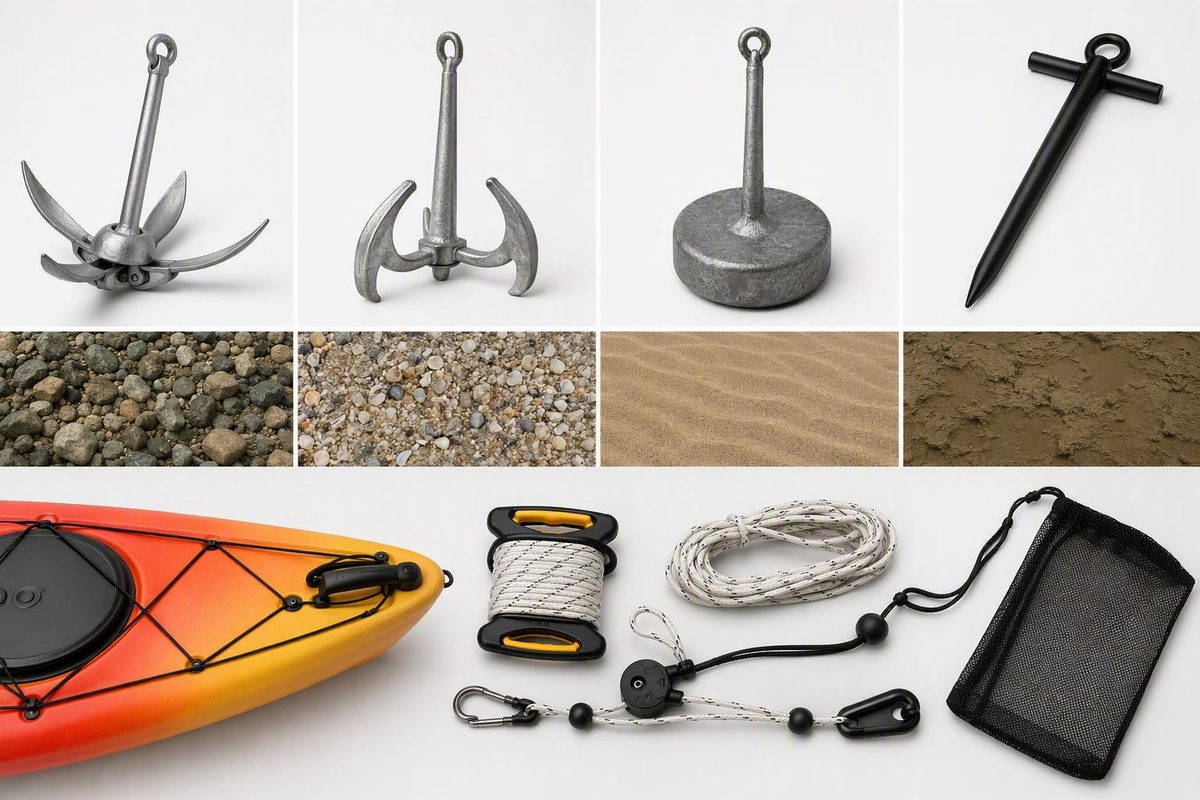
Safety warning: Anchoring a kayak can lead to capsize, entanglement, separation from the kayak, or a rescue situation. Risk increases in fast current, tide, swell, deteriorating weather, and vessel traffic. The load should normally act near the bow or stern, and the paddler needs an immediately accessible way to release or cut the rode. Do not anchor if you cannot assess the conditions, keep the kayak aligned with the load, or release the system at once. These hazards—including capsize and separation from an anchored kayak—are described in Cornish Kayak Angler’s safety-focused anchoring guide.
There is no universally best anchor for a kayak. The right purchase depends on the bottom, depth, wind, current or tide, loaded kayak, available storage, and whether you need to stop or merely slow your drift.
The anchor itself is only one part of the decision. A workable system also needs controlled rode storage, a suitable bow-or-stern attachment, compatible hardware, secure anchor storage, and a release plan that remains usable under load.
Start with the conditions, not an anchor model
Before comparing products, define the job. Do you need to remain close to one spot, hold approximately within an area, point the kayak into the wind, or simply slow a drift? A fixed anchor may suit the first goal, while a drift sock or drag chain may be more appropriate for the last.
Work through these variables:
- Bottom: Soft mud, firm sand, gravel, rock, weeds, roots, submerged timber, and debris interact differently with each anchor design.
- Depth: Depth affects rode requirements, retrieval effort, storage, swing room, and whether a stake-out pole can reach and penetrate the bottom.
- Wind: A high seat, crate, rods, electronics, motor, and other exposed equipment can increase windage.
- Current or tide: Moving water creates continuous load. Tidal flow can strengthen, weaken, or reverse.
- Loaded kayak: Consider the paddler, battery, motor, pedal drive, fishing gear, catch, water, and other cargo—not hull length alone.
- Storage and handling: The anchor must be secured aboard without becoming a loose projectile or obstructing paddling, pedaling, re-entry, or fishing.
- Retrieval risk: An anchor that catches structure aggressively may also be the hardest to recover.
- Desired behavior: Stopping, holding approximately, and slowing down are different tasks.
- Failure path: Identify where the kayak will drift if the anchor releases or drags.
Quick-selection matrix
| Paddling scenario | Conditional starting category | Why it may fit | Main caution |
|---|---|---|---|
| Calm, protected lake with soft mud or sand | Mushroom anchor or compact simple weight | Relies mainly on mass and bottom contact | Bulky for its holding ability; limited suitability for hard bottom or meaningful flow |
| Shallow mud or sand flat | Manual stake-out pole | Directly pins or tethers the kayak without a conventional anchor | Usable depth is less than nominal pole length because the pole must penetrate the bottom and remain controllable above water |
| Mixed or rocky bottom | Folding grapnel | Compact flukes can catch uneven ground | High snag and difficult-retrieval potential |
| Snag-filled water | Avoid aggressive grapnels; reconsider anchoring | Recoverability may matter more than maximum grip | Roots, wreckage, reefs, debris, and rocks can trap equipment |
| Moderate flow over sand or mud | Claw or Bruce-style anchor | Plow-like geometry is commonly matched to penetrable bottom | No universal safe-current limit; the complete system must be assessed and tested |
| Controlled drift rather than a full stop | Drift sock or protected drag chain | Reduces movement without creating the same fixed hold | Lines, chain, and hardware can still foul or snag |
These are starting categories, not performance guarantees. Commercial guidance commonly associates grapnels with rocky or mixed bottom, claws with sand or mud, mushrooms with calm soft-bottom water, stake-out poles with shallow flats, and drift devices with slowing rather than stopping (Vibe Kayaks’ anchor-type overview).
No evidence reviewed for this guide establishes independently tested holding forces or universal operating limits for wind, current, waves, tide, or depth. If you cannot judge the conditions or release the system immediately, do not anchor.
Kayak anchor types and where each one fits
Fixed anchors, shallow-water positioning tools, and drift-control devices perform different jobs. Treating them as separate categories makes product comparisons more useful.
Folding grapnel anchor
A folding grapnel normally has four hinged flukes and a collar that locks them open or closed. Folded, it occupies relatively little storage space. It is commonly presented as a starting option for mixed, rocky, hard, or weedy bottom.
Its advantage is also its liability. The flukes can catch rocks, vegetation, roots, reefs, wreckage, or debris. That may create a strong hold, but it can also make recovery difficult or unsafe. Fighting a trapped grapnel from a seated kayak can increase the load or pull the hull into an unstable orientation.
Choose a grapnel only with a plan for snag avoidance, immediate release, and possible loss. Secondary eyelets and weak-link arrangements exist, but no improvised “breakaway” feature should be assumed to release predictably.
Claw or Bruce-style anchor
A claw or Bruce-style anchor has a curved, plow-like form intended to engage the bottom. Commercial and enthusiast guidance commonly associates this category with sand, mud, gravel, or shingle.
It may be a more logical starting category than a grapnel where the anchor needs to dig into a penetrable bottom rather than hook discrete structure. That is not proof of superior performance: the supplied evidence contains no controlled comparison showing that a particular claw will outperform another design on your bottom, rode, kayak, or conditions.
Mushroom or simple weighted anchor
A mushroom anchor has a rounded head and relies largely on mass and bottom contact.
Limit this category to calm, protected water over soft mud or sand. It is less compelling on hard bottom or in meaningful flow, where it may slide rather than penetrate. Its mass and shape can also consume a significant share of a kayak’s payload and storage space.
Owner reports about weighted anchors vary widely. Those anecdotes are not sizing standards because bottom softness, kayak windage, rode angle, load, and local conditions can differ even when the stated anchor weights are similar.
Stake-out pole
A stake-out pole is pushed into penetrable sand or mud to position a kayak in shallow water. It is not a deep-water anchor and should not be treated as one.
Commercially listed poles commonly fall between approximately six and eight feet. However, an eight-foot pole does not provide eight feet of usable water depth: part of the pole must penetrate the bottom, and enough must remain above water for handling and retrieval. Retail evidence includes six-foot and seven-foot-eight-inch examples (Yakworks’ anchoring collection).
A long pole creates a storage and clearance problem. Confirm that it can be secured without obstructing paddling, casting, re-entry, a pedal drive, rudder, or motor.
Drag chain and drift sock
A drag chain and a drift sock are drift-control devices rather than conventional fixed anchors. They generally reduce speed instead of holding the kayak over one coordinate.
A protected chain may be used when a river paddler wants a slower downstream presentation rather than a complete stop. A drift sock creates resistance in the water and may help control movement in open or windy conditions.
Neither option is snag-proof.
Brush grippers and powered shallow-water poles
A brush gripper tethers the kayak to an existing fixed object such as a branch, dock, or stump. It is highly situational. The object must be suitable, and the line must be routed so that the kayak can be released and kept in a stable orientation. Check applicable property, navigation, anchoring, and environmental restrictions before attaching to structures or vegetation.
A powered shallow-water pole uses a motorized mechanism to deploy a spike, often from the stern. Remote operation may be convenient, but the system adds cost, mass, electrical demand, mounting requirements, and installation complexity. One personal-use account reports approximately 3.5 kilograms for the power unit and another 1.3 kilograms for its separately sold battery, with the spike sold separately and some kayaks requiring a plate or drilled mounting holes (powered and manual anchor comparison).
Anchor-type comparison
The following ratings are qualitative editorial summaries of the supplied guidance, not tested performance grades.
| Type | Suitable bottom | Intended water | Holding behavior | Snag risk | Retrieval difficulty | Packed size | System weight | Primary limitation |
|---|---|---|---|---|---|---|---|---|
| Folding grapnel | Mixed, rocky, hard, or weedy | Carefully selected sites where snags can be managed | Hooks uneven ground or structure | High around roots, rock, wreckage, reefs, weeds, and debris | Moderate to very high | Small when folded | Usually light to moderate | Grip and recoverability conflict |
| Claw/Bruce | Sand, mud, gravel, or shingle | Soft-bottom lakes, estuaries, and sheltered coastal areas | Digs or plows into penetrable bottom | Moderate and site-dependent | Moderate | Less compact than many folding grapnels | Light to moderate | Must set correctly; no universal operating limit |
| Mushroom/simple weight | Soft mud or sand | Calm, protected lakes and ponds | Resists by mass and bottom contact | Relatively low, but not zero | Usually straightforward | Often bulky | Moderate to heavy | Limited usefulness on hard bottom or in flow |
| Stake-out pole | Penetrable sand or mud | Shallow flats and marshes | Pins or tethers the kayak to shallow bottom | Low to moderate | Usually easy unless deeply jammed | Long and awkward | Light to moderate | Strict depth, penetration, and storage constraints |
| Drag chain | Variable; often discussed for rocky rivers | Controlled downstream drift | Slows rather than fixes position | Moderate to high | Highly site-dependent | Compact but dense | Moderate | Can snag and create a consequential load |
| Drift sock | Does not engage bottom | Open water where slowing is desired | Adds drag in the water | Lower bottom-snag exposure, but lines can foul | Usually manageable | Compact | Light | Does not hold a fixed position |
| Brush gripper | Fixed object rather than bottom | Near suitable shoreline structure | Tethers the kayak to an object | Depends on the object and routing | Usually easy if accessible | Very small | Light | Requires an appropriate object and permission where applicable |
| Powered pole | Penetrable shallow bottom | Shallow flats | Motor-deployed pinning | Design- and site-dependent | Normally powered, but power or obstruction problems remain possible | Bulky installation | High | Cost, power, mounting, depth, and installation complexity |
How heavy should a kayak anchor be?
Anchor weight alone cannot predict whether a kayak will hold. Performance also depends on:
- Anchor geometry and whether it penetrates or hooks the bottom
- Bottom hardness and composition
- Rode angle and deployed length
- Line material, diameter, strength, elasticity, and wet handling
- Whether chain is used
- Fully loaded kayak displacement
- Hull windage and exposed equipment
- Current, waves, and changing water level
- The point at which the load reaches the hull
For that reason, “What weight?” cannot be answered responsibly without also asking: “Which design, on what bottom, attached how, and in what conditions?”
Retail listings include folding grapnels from approximately 1 to 3 pounds, while published kayak guidance commonly gives starting suggestions around 1.5 to 3.5 pounds for smaller kayaks or calmer conditions. Kayak Angler, for example, suggests 3 pounds for a lighter kayak in calm water and 5 to 7 pounds for a larger kayak in deeper water (Kayak Angler’s anchoring guide).
That disagreement demonstrates the absence of a settled universal rule; it does not prove that a heavier anchor makes adverse conditions safe (Anchor-Man’s commercial sizing guide).
A better sizing workflow
- Identify the bottom. Choose the likely anchor geometry before choosing its weight.
- Calculate the actual loaded kayak. Include the paddler, pedal drive, motor, battery, crate, electronics, fishing equipment, water, catch, and cargo.
- Define ordinary use. Specify the planned depth, exposure, current, wind, and available swing room. Do not size around conditions in which anchoring would be imprudent.
- Check payload and trim. Count the anchor, wet rode, chain, connectors, reel or bag, trolley, and mounting hardware.
- Check handling. You must be able to deploy, release, retrieve, and secure the system without destabilizing the kayak.
- Choose a conservative starting setup. Use category-specific guidance, applicable kayak and equipment instructions, and local knowledge.
- Test in calm, controlled water. Start close to an easy recovery point with abundant room.
- Stop if the system drags or loads the kayak poorly. Do not try to correct unstable loading simply by adding mass.
More mass cannot turn fast current, large swell, bad weather, or an inadequate release system into acceptable anchoring conditions.
Never convert an anecdotal anchor weight into a promised wind speed, current speed, depth, or sea-state rating.
Build the complete system: rode, chain, trolley, cleat, float, and storage
Buying an anchor is only the first step. The system must manage deployment, load transfer, release, retrieval, and storage.
Complete-system checklist
- An anchor, pole, or drift-control device suited to the intended bottom and task
- Rode with appropriate material, diameter, rated strength, elasticity, abrasion resistance, and wet-handling characteristics
- Optional chain where its benefit justifies the added weight and hardware
- An anchor trolley or suitable fixed bow/stern attachment
- A cleat, line lock, or controlled line-management device
- A reel, bag, spool, or other contained rode storage
- Connectors, pulleys, rings, shackles, and fasteners suitable for the expected corrosion exposure
- An immediately reachable release method
- A recovery float where temporary abandonment is part of the planned system
- A cutting tool appropriate for the selected rode and accessible without opening a hatch
- A secure place to stow the anchor low and near the kayak’s center
Do not prescribe “low stretch” as a universal rule. Follow the specifications for the anchor, kayak, line-management hardware, and connectors rather than choosing solely by material name.
What an anchor trolley does
An anchor trolley is normally a cord loop running through fittings or pulleys toward the kayak’s ends. A ring or carabiner in the loop carries the rode. From the seat, the paddler moves that working connection toward the bow or stern so the kayak can align more nearly lengthwise with the dominant wind or current.
The trolley does not anchor the kayak and does not make anchoring inherently safe. It only changes where the rode’s load reaches the kayak. The bow-or-stern orientation and capsize implications are described in the same kayak anchoring safety guide.
Keep the equipment categories clear:
- Anchor: Engages the bottom or resists movement through mass.
- Trolley: Moves the rode connection toward an end of the kayak.
- Cleat or line lock: Controls or secures rode.
- Reel or spool: Stores and dispenses line.
- Track mount or pole holder: Secures an accessory to the kayak.
- Stake-out pole: Positions the kayak on a shallow, penetrable bottom.
Retailers may place all these products under “anchoring,” but that does not make every listed accessory a weighted anchor.
How much rode?
Published kayak guidance conflicts. One specialist magazine suggests approximately twice the water depth as a general starting point, a manufacturer guide says at least three times depth, and commercial material recommends ranges of three to five or five to seven times depth.
These ratios are not interchangeable safety standards. A depth-only calculation omits anchor geometry, bottom composition, line elasticity, chain, current, wind, waves, attachment height, and swing room.
One commercial guide recommends five to seven times depth and describes a kit containing 50 feet of rope, chain, shackles, and a storage bag. Treat both the ratio and kit description as seller-specific guidance, not universal requirements (Anchor-Man’s rode and kit guidance).
Choose rode for the maximum planned depth, the geometry of the anchor system, and available swing room. Retain a margin and a way to contain every unused section. If the location lacks room for the amount of rode your system requires, it may not be an appropriate anchoring location.
Optional chain
The tradeoffs are additional weight, wet handling, noise, corrosion exposure, and more hardware. Chain can also complicate storage and retrieval. No universal chain length is supported here, so treat it as an optional system component rather than a requirement or a guarantee that the anchor will set.
Examples of equipment formats
Current listings illustrate possible formats rather than establishing one correct setup. YakAttack lists a SideWinder reel supplied with 75 feet of 550 paracord, along with cleats, trolley kits, and stake-out-pole accessories (YakAttack’s anchoring category).
A separate specialty-retailer listing includes a 75-foot, 3/16-inch nylon line and kits containing combinations of rope, carabiners, and storage bags. These are product-specific inclusions, not recommendations that either line is suitable for every anchoring system.
Before ordering, verify:
- Line material, construction, diameter, length, and rated strength
- Compatibility with the cleat, reel, trolley, and connectors
- Whether chain and shackles are included
- How the wet line and anchor will be stored
- Whether the full system fits the planned depth and swing room
Store the anchor securely, low and near the kayak’s center where practical. Keep rode contained so that no loose coil crosses the paddler, footwell, paddle stroke, pedal drive, motor, rudder controls, hooks, or rods.
Why attachment position and quick release are safety-critical
An anchor load should normally act near the bow or stern so the kayak aligns lengthwise with wind or water movement. A direct side load presents more hull area to the force and can increase capsize risk. Kayak Angler likewise warns that a kayak positioned sideways to wind or current can flip and that line can create an entanglement hazard (Kayak Angler’s safety and rigging guidance).
A side-mounted trolley is not an instruction to anchor broadside. The side cord is a mechanism for moving the working rode connection to an end. Continue monitoring the actual rode position and kayak angle after the trolley is set.
Design for release before designing for hold
The paddler needs an immediately accessible way to unload, disconnect, or cut the system. The supplied evidence does not validate the load performance of any particular quick-release arrangement, so no one configuration should be treated as universally reliable.
Whatever arrangement you choose should be:
- Understood before launch
- Reachable while seated
- Operable without searching inside a hatch
- Practiced in controlled conditions
- Compatible with the rode, cleat, trolley, and kayak
- Kept clear of loose line and fishing equipment
The cutting tool should be secured against loss, reachable while wearing a life jacket, and capable of cutting the selected rode.
Do not wrap rode around your hand, arm, leg, or body. Keep the working line out of the cockpit and footwell as far as the layout permits. Manufacturer guidance also recommends keeping a knife or quick-release system available during deployment (Vibe Kayaks’ system guidance).
Recovery float and temporary abandonment
A recovery float can allow the paddler to release the rode and locate it later rather than continuing to fight a snag or rising load from the seat. YakGear describes a float leash intended for temporarily leaving an anchor and finding it afterward (YakGear’s anchor guide).
This must be designed before deployment. The float must suit the system, and the release cannot depend on improvised steps under load. Verify local navigation and abandoned-gear rules, and do not leave a floated rode where it could endanger other water users. Delay recovery if returning to the anchor would expose the paddler to the original hazard.
Holding versus recoverability
A grapnel illustrates the central tradeoff: the same fluke that catches rock can become locked beneath it. Some anchors have secondary eyelets, and some paddlers use weak-link or breakaway arrangements intended to change the direction of pull during retrieval.
Those arrangements exist, but zip ties and other improvised links are not validated safety devices in the supplied evidence. Plan to lose an anchor rather than assume an improvised component will release at exactly the desired load.
Conservative no-anchor triggers
Treat the following as conservative editorial stop conditions rather than a formal operating standard:
- The kayak cannot be kept end-on to the load.
- The release cannot be reached or operated immediately.
- Current or tide is uncertain or changing beyond your understanding.
- Large swell, breaking waves, or unstable chop is present.
- Weather is worsening.
- Traffic is heavy or the kayak could swing into a navigation route.
- There is insufficient room to drift if the anchor fails.
- The bottom contains hazards you cannot avoid.
- Loose rode cannot be contained.
- The situation exceeds your practiced ability.
Wear an appropriate life jacket. Kayaks Hub’s own water-safety notice also advises wearing one, although that site notice is not a substitute for location-specific instruction or official regulations (Kayaks Hub terms and safety notice). Practice release and re-entry in controlled conditions before considering an anchor in moving water.
A cautious deployment, monitoring, and retrieval sequence
The following sequence is conservative editorial guidance synthesized from the supplied kayak-anchoring guides. It is not a certified training protocol and cannot eliminate the risks of current, capsize, snagging, or entanglement.
Before launch
Inspect:
- Anchor, flukes, collar, pole, chain, or drift device
- Rode for abrasion, cuts, stiffness, contamination, or knots
- Shackles, carabiners, swivels, rings, and other connectors
- Trolley cord, pulleys, fittings, and travel
- Cleat or line lock
- Hull and mounting points
- Storage bag, reel, or spool
- Release mechanism
- Recovery float, if used
- Cutting tool and its accessibility
Assess:
- Forecast and observed weather
- Tide, current, river flow, and changing water level
- Water depth and bottom type
- Vessel traffic and navigation routes
- Submerged hazards
- Swing room
- Shore access
- The kayak’s likely path if the anchor drags or releases
Practice the complete sequence in calm, controlled water near an easy recovery point. Do not learn the system for the first time in tidal water, big water, or strong current.
Deployment
- Prepare the system while stable. Keep the anchor secured low and central until needed. Confirm that the rode is contained and clear of the paddle, body, hooks, pedal drive, rudder, and motor.
- Move into the intended position. Allow for the distance the kayak may travel while the anchor reaches the bottom and begins to engage.
- Lower rather than throw the anchor. Throwing can create tangles, damage equipment, or shift the paddler’s balance.
- Pay out rode gradually. Maintain control without wrapping line around a hand or body part.
- Route the rode correctly. Pass it through the planned trolley ring, fairlead, or fixed end attachment.
- Move the working point toward the bow or stern. Watch the kayak’s actual alignment with wind or current.
- Test the hold progressively. Avoid sudden shock loading and confirm that the kayak remains stable and end-on.
- Control the rode. Keep the release and cutting tool immediately available.
Published deployment guidance similarly recommends assessing conditions, lowering the anchor slowly, paying out line, setting the kayak angle with a trolley, and testing the hold.
Monitoring
Anchoring is not a set-and-forget task. Continue watching:
- Kayak angle
- Signs of dragging
- Changing wind
- Rising or falling water
- Reversing or strengthening current
- Vessel traffic
- Swing room
- Rode chafe or fouling
- Waves arriving from a new direction
- Access to the release and cutting tool
Adjust rode only when doing so is safe. If the kayak turns broadside, the load rises unexpectedly, or the release becomes obstructed, leave the anchoring situation rather than trying to preserve the position.
Retrieval
- Reduce the load before pulling. Move toward the anchor only if doing so is controlled and will not foul the rode.
- Keep the kayak oriented as nearly end-on as possible.
- Retrieve line steadily without wrapping it around your hand.
- Contain recovered rode immediately.
- Avoid pulling hard from the side or leaning beyond the kayak’s stable range.
- If snagging or unstable loading develops, use the planned release rather than escalating force from the seat.
- Recover a floated anchor later only when conditions permit.
Once aboard, secure the anchor and every section of line before paddling away or engaging a pedal drive or motor.
Match the setup to five common paddling scenarios
These examples are starting frameworks, not prescriptions or performance guarantees.
1. Calm lake or protected pond with soft bottom
Consider a light mushroom anchor or another compact weighted design, paired with contained rode, a bow-or-stern working attachment, immediate release, and secure central storage.
This setup prioritizes uncomplicated deployment and retrieval rather than aggressive penetration. Test it on the actual bottom in calm conditions. “Protected” does not mean unchanging: wind can rise, and recreational traffic can create waves.
2. Shallow sand or mud flat
Consider a manual stake-out pole when the water is shallow enough, the bottom is penetrable, and wind and current are mild. Judge usable depth rather than nominal pole length because penetration and above-water handling reduce reach.
A powered system adds remote deployment but also introduces a motor unit, spike, power supply, mounting hardware, weight, cost, and possible drilling. It is a more complex installation, not automatically a safer one.
3. Mixed or rocky lake bottom
A folding grapnel may be practical because it packs small and can engage irregular ground. The same geometry can trap it under rocks or in vegetation.
Avoid obvious snag fields. Include an immediate release plan and accept that safe use may require abandoning the anchor. Do not continue pulling from an unstable kayak angle merely to recover inexpensive equipment.
4. Sand or mud with moderate flow
A claw or Bruce-style anchor may be a more appropriate starting category than a grapnel because its geometry is intended to dig into penetrable bottom. Select the rode and attachment as parts of the same system, then test conservatively.
No supplied source establishes a safe current threshold for a particular claw anchor and kayak. If holding requires a load that compromises stability or immediate release, stop anchoring.
5. Rocky river where slowing is preferable to stopping
A protected drag chain may reduce downstream speed while allowing controlled movement. Treat it as drift control, not as a fixed anchor.
Chain can still wedge between rocks or catch debris. Keep the load toward an end of the kayak, contain the line, and retain immediate release. If the terrain, current, or downstream obstructions would make a snag consequential, do not deploy it.
Conditions that should not receive a product recipe
Tidal races, offshore water, fast rivers, large swell, breaking waves, rough weather, and high-traffic channels require more than a shopping recommendation. The available evidence does not establish safe operating limits for these environments.
Declining to anchor—or obtaining location-specific instruction from a qualified paddlesport professional—is the responsible choice when conditions exceed controlled recreational use.
Buying checklist, compatibility, and realistic system cost
An anchor can be inexpensive while the safe, compatible system around it is not. Audit the whole installation before ordering.
Compatibility audit
Confirm:
- Kayak construction: Sit-on-top, sit-inside, inflatable, folding, composite, and rotomolded hulls have different mounting constraints.
- Loaded capacity: Add the complete wet anchoring system to every person and item aboard.
- Storage: Identify exactly where the anchor, rode, pole, and chain will go.
- Track standard: Track-mounted products are not automatically cross-compatible.
- Hull clip: A manufacturer-specific clip should not be assumed to fit another hull.
- Pedal-drive clearance: Check both deployment and retrieval paths.
- Rudder and motor clearance: Consider steering range, propeller, cables, and the rode under load.
- Trolley travel: Verify that the working ring can reach the intended bow or stern position.
- Backing access: Load-bearing fittings may need washers, nuts, backing plates, or specified rivets.
- Mounting plates and adapters: Powered poles and other accessories may require separate hardware.
- Drilling implications: Confirm warranty, sealing method, hull access, and structural suitability before making holes.
- Fastener material: Match hardware to corrosion exposure and neighboring metals.
- Freshwater or saltwater use: Saltwater increases corrosion-management demands.
The headline price may therefore cover only part of the working system.
For load-bearing trolley fittings, Cornish Kayak Angler recommends marine-grade 316/A4 stainless bolts, washers, and nyloc nuts. Where backing access is unavailable, the same guide recommends trifold rivets and advises against self-tapping screws. This is source guidance, not an engineering standard for every hull. Follow the kayak and hardware manufacturers’ instructions and seek competent installation advice when structural suitability is uncertain.
Dated price snapshot
The following USD list prices were observed in the supplied retailer and editorial evidence reviewed on September 2, 2026. They are budgeting examples, not rankings. Shipping, taxes, installation, and unlisted components are excluded unless a seller explicitly says otherwise.
| Equipment | Observed list price | Source and qualification |
|---|---|---|
| Folding or weighted anchors | $13.99–$26.97 | Yakworks listings for folding and weighted kayak anchors; price and availability may change |
| Anchor trolley kits | $34.99–$46.00 | Yakworks and YakAttack listings; installation is not included |
| Anchor-line reel | About $36.00 | YakAttack SideWinder listing, supplied with track hardware and 75 feet of 550 paracord |
| Manual stake-out poles | $76.95–$101.95 | Yakworks listings for six-foot and seven-foot-eight-inch poles |
| Powered shallow-water systems | $599–$799 | Editorially reported range excluding the spike and power supply |
The lower-cost anchors, trolleys, reel, and manual poles appear in the Yakworks retailer listings. FishTalk reports the much higher powered-system range and specifies that the spike and power supply are excluded (FishTalk’s kayak-anchor overview).
Prices, availability, and included parts can change. A low anchor price may exclude:
- Rode
- Chain
- Trolley or fixed attachment
- Cleat or line lock
- Connectors
- Storage
- Recovery float
- Release equipment
- Cutting tool
- Track adapters or mounting plate
- Backing and fasteners
- Battery and charger
- Installation
A product-specific example shows why verification matters. Tucktec describes a one-pound aluminum folding grapnel supplied with a 12-foot rode, hull clip, and bag for its folding-kayak context (Tucktec’s folding anchor product page). The listing does not establish that the clip fits non-Tucktec kayaks or that the included rode suits a particular depth, bottom, or condition.
Use this purchase sequence:
- Define the operating scenario.
- Choose the appropriate anchor or positioning category.
- Design the end-on attachment and immediate release.
- Check hull compatibility, clearance, payload, and storage.
- Add every required component to the total price and system weight.
- Verify exactly what the kit includes.
- Install according to applicable manufacturer guidance.
- Test the complete setup only in calm, controlled conditions.
The useful question is not simply, “Which anchor fits a kayak?” It is, “Which complete system fits this kayak, bottom, depth, flow, and risk level?” If the kayak cannot remain end-on to the load or the system cannot be released immediately, the correct choice is not to anchor.
What is the best all-around anchor for a kayak?
There is no universal best anchor. A folding grapnel is a compact starting point for some mixed or rocky bottoms, but its snag risk can make it unsuitable around roots, wreckage, reefs, or debris. A claw may better match penetrable sand or mud, a mushroom may suit calm soft-bottom water, and a stake-out pole may be preferable on shallow flats.
Choose by bottom and operating scenario, then evaluate the rode, attachment, release, retrieval, and storage system as a whole.
Is a 3-pound or 3.5-pound anchor enough for a kayak?
It may be a reasonable starting weight for some smaller kayaks in calm conditions, but it is not a guarantee. Published and commercial guidance includes approximately 3 to 3.5 pounds among common starting suggestions, while other sources recommend heavier systems for larger kayaks or different conditions.
Test in controlled water, and never use additional anchor mass to justify anchoring in hazardous conditions.
How much anchor line should I carry for a kayak?
Carry enough rode for your maximum planned depth, the geometry required by the anchor and bottom, a margin, and controlled retrieval—without exceeding the available swing room or storage capacity.
Published recommendations range from approximately two times depth to five-to-seven times depth. Because those figures conflict and omit important variables, none should be treated as universally safe. Follow equipment-specific guidance, account for conditions and geometry, and keep unused line contained.
Do I need an anchor trolley on a kayak?
Not always. A suitable fixed bow or stern attachment may work for a defined setup. A trolley is useful when a seated paddler needs to shift the rode’s working connection between the bow and stern.
A trolley does not eliminate capsize risk or make broadside anchoring acceptable. Its fittings, travel, mounting points, and hardware must be compatible with the kayak and anticipated load.
Can I anchor a kayak in a river or tidal current?
It may be possible in carefully assessed locations, but moving water increases the consequences of poor attachment, snagging, dragging, broadside loading, and failed release.
No evidence reviewed here establishes a universally safe river or tidal-current threshold. If the flow is uncertain, the kayak cannot stay aligned, downstream recovery room is inadequate, or the system cannot be released immediately, do not anchor.