
How to Choose Outriggers That Fit Your Kayak and Your Priorities
Use a compatibility worksheet to choose a float type, verify the mounting method and package contents, then test the setup on calm water.
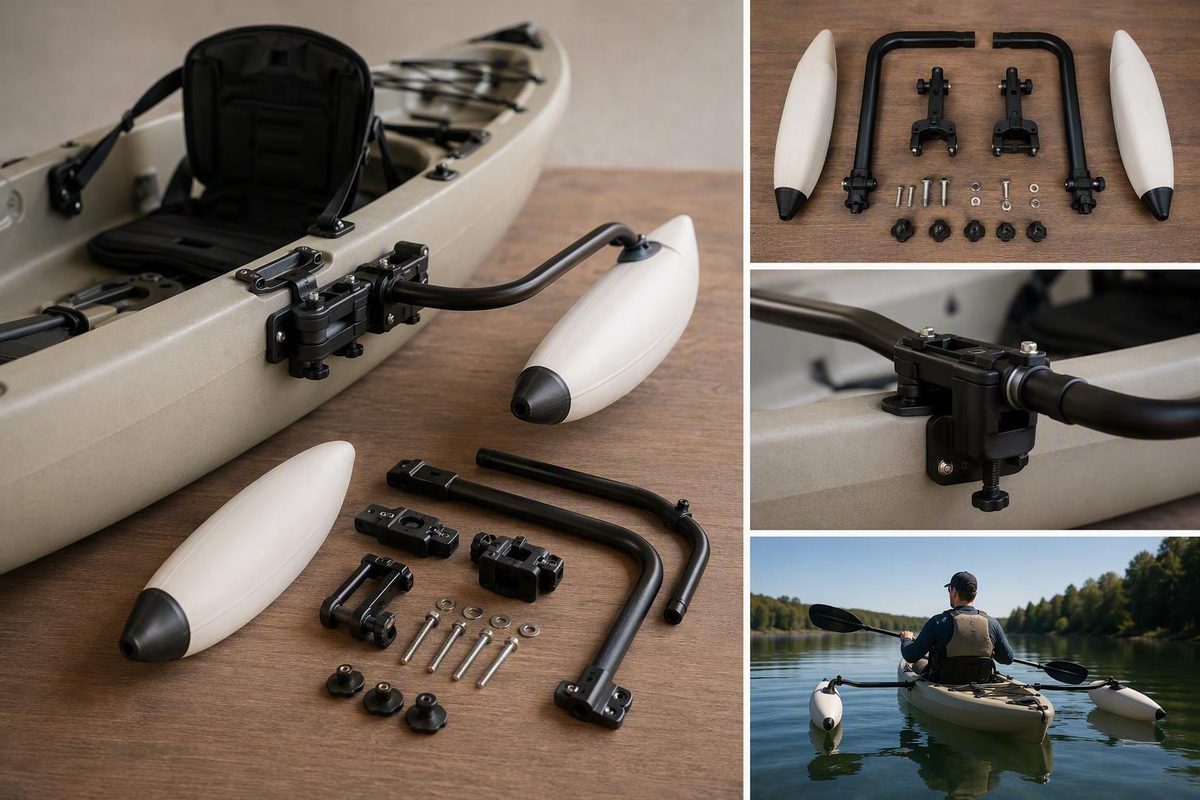
Choose kayak stabilizers in this order: define what you need them to do, measure your kayak, choose a float type, confirm a structurally suitable mounting method, and verify every component included in the package. Outriggers can provide lateral support as the kayak leans, but they do not increase its rated load capacity, prevent every capsize, or make standing and rough-water paddling universally safe.
The short answer: choose by fit and use, not by ratings
Kayak stabilizers—also called outriggers—typically place two floats away from the hull on lateral arms. This widens the effective base and provides additional support when the kayak heels toward one side.
Start with the intended job. A photographer seeking steadier seated framing has different priorities from an angler who removes the system after every trip, an adaptive paddler who needs repeatable positioning, or a recreational paddler with limited storage. Measure the boat before comparing products, then decide what compromises you can accept in deployed width, drag, weight, paddle clearance, storage, setup time, and recovery.
| Use case | Likely design priority | Fit checks | Main tradeoff |
|---|---|---|---|
| Compact transport | Inflatable floats, removable arms, small packed size | Deflated dimensions, valve protection, arm breakdown, carry-bag size | Inflation, drying, puncture, and leak management |
| Frequent fishing | Repeatable setup, secure mounts, paddle and line clearance | Seat position, rod-holder layout, track capacity, float location | Added beam, potential line snags, drag, and transport bulk |
| Adaptive access | Dependable mounting and useful height or width adjustment | Transfer path, support near the paddler, caregiver access, rescue procedure | More hardware, setup complexity, and possible re-entry interference |
| No-drill installation | Track, clamp-on, or compatible existing-hole mount | Track profile and capacity, clamp geometry, existing-hole purpose and spacing | Placement may be limited to compatible tracks, holes, or clampable surfaces |
| Saltwater use | Corrosion-resistant components and serviceable joints | Fastener materials, dissimilar metals, rinse access, replacement parts | More maintenance and potentially higher total cost |
Treat stabilizers as one part of the complete setup, not as permission to take risks the kayak, paddler, or conditions do not support. They may reduce tipping risk, but they cannot establish that standing, wakes, wind, current, surf, or rough water will be safe.
How kayak stabilizers work—and what they do not do
A kayak normally relies on its hull shape and loading to resist rolling. Outrigger floats add support farther from the centerline. As the kayak leans, one float contacts the water or becomes more deeply immersed, producing an opposing buoyant force.
Moving a float farther outward generally gives that force more leverage. The actual effect depends on float volume and shape, arm geometry, hull design, mounting position, load, speed, and water conditions. General design logic cannot replace product- and kayak-specific testing.
Some systems are adjusted so the floats ride slightly above the water while the kayak is level and engage as it leans. This may reduce continuous water contact, but it also allows some initial side-to-side movement before a float engages. Other configurations keep the floats in continuous contact for earlier support. Neither approach is universally correct: float height must suit the product, kayak, paddler, and activity.
Added flotation is not an increase in the kayak’s rated carrying capacity. Count the paddler, clothing, seat, stabilizer system, battery, motor, fishing equipment, coolers, and all other gear against the limit stated by the kayak manufacturer. A float may displace water, but it does not validate the hull, scuppers, seat, deck, accessory tracks, or handling at a heavier load. Vendor guidance likewise advises remaining within the boat manufacturer’s load limit (Angle Oar’s stabilizer guidance).
Outriggers do not make a kayak uncapsizable. Their floats and arms can also change how you right the boat or climb back aboard. Practice with the complete setup under qualified supervision before relying on it away from shore.
Inflatable, rigid, or foam: a practical comparison
Float material affects packing, setup, inspection, and storage, but material alone does not determine which system is safest or most stable. Float volume, shape, stance, height, arm stiffness, mount integrity, and kayak geometry also matter.
| Float type | Practical advantages | Ongoing requirements | Likely fit |
|---|---|---|---|
| Inflatable PVC | Low packed volume; convenient for small vehicles, apartments, or occasional use | Inflate as directed; inspect valves and pressure; check for leaks and punctures; rinse, dry, protect, and carry repair supplies | Occasional recreation and users prioritizing compact storage |
| Rigid polyethylene or PVC | No inflation or valve tasks; quick deployment once assembled | Allow for greater storage bulk and potentially more system weight; inspect shells, arms, and fasteners | Frequent fishing or repeated setup where packed size matters less |
| Coated foam | No inflation; simple solid-float construction | Inspect the coating, attachment points, and any exposed or damaged foam | Uses where straightforward deployment matters, subject to product-specific assessment |
Inflatable systems make sense when packed volume is the main constraint. Their convenience depends on accepting additional tasks: reaching the specified inflation condition, protecting valves, watching for slow leaks, drying the floats before storage, and knowing how to use the supplied repair materials. Check whether a pump and the correct valve adapter are included.
Rigid floats eliminate inflation and valve management. In broad terms, they may occupy more storage space and add more weight, although neither characteristic applies equally to every product. Measure your vehicle, storage area, hatch openings, and roof-rack arrangement rather than assuming the arms and floats will fit.
Coated-foam floats are another available construction. Compare the exact product rather than inferring price, drag or durability from foam construction alone. Evaluate the coating, attachment design, dimensions, replaceability, mounting system, and documented compatibility of the individual product.
For occasional recreation, an inflatable package may be practical if it packs small enough and the setup routine is acceptable. Frequent anglers may prefer a rigid or foam system that avoids inflation, particularly if it can remain assembled between trips. For adaptive access, dependable mounting, reproducible adjustment, support in the right location, and a workable rescue plan may matter more than float material.
Compatibility worksheet: measure before you buy
A listing that says “for kayaks” establishes very little. Compatibility depends on deck layout, hull dimensions and material, mounting structure, hardware access, hole patterns, seat position, paddle stroke, and the intended float location.
Complete this worksheet before comparing packages:
- Kayak make and model: ________
- Model year, if known: ________
- Hull material: rotomolded / thermoformed / composite / inflatable / other: ____
- Manufacturer-rated load limit: ________
- Maximum beam: ________
- Usable mounting span: ________
- Available flat deck area: length __ width ____
- Accessory-track brand or profile: ________
- Track’s permitted load and mounting restrictions: ________
- Existing holes, inserts, or compatible mounts: ________
- Hole spacing and fastener size: ________
- Access to the underside of the deck: full / limited / none
- Seat position relative to proposed mounts: ________
- Clearance through the full paddle sweep: ________
- Clearance from rudder controls, pedal drive, anchor, motor, and crate: ________
- Desired float position: front / beside paddler / behind seat / rear deck / undecided
- Desired deployed width: ________
- Maximum packed dimensions: ________
- Vehicle or roof-rack width constraint: ________
- Tolerance for permanent drilling: yes / no / conditional
- Manufacturer approval or written guidance obtained: ________
Ask both the kayak manufacturer and stabilizer manufacturer whether the proposed mounting method is permitted—especially before drilling, clamping a shaped deck edge, or loading accessory tracks. The available evidence does not establish a universal deck-strength requirement or safe mounting load across rotomolded, thermoformed, composite, and inflatable kayaks. If neither manufacturer provides an answer, a generic hardware fit should not be treated as proof of structural suitability.
Next, audit the package. Confirm that the quoted price includes:
- Two floats
- Two float arms
- A crossbar or connecting rod, if required
- Deck, side, track, or clamp mounts
- Track adapters or model-specific adapters
- Retaining pins and clips
- Fasteners, nuts, washers, and backing hardware
- Installation tools or special fittings, if required
- Inflation equipment and a repair kit, where applicable
Mounting and adjustment: drilling, tracks, clamps, and float position
The mounting method often determines whether a stabilizer is viable:
- Drilled side-deck mounts provide a fixed interface but permanently alter the kayak. They may require backing plates and access beneath the deck.
- Accessory-track mounts can avoid new holes and allow repositioning, but only if the track, adapter, and supporting deck structure are suitable for the imposed loads.
- Clamp-on designs avoid drilling where the hull or gunwale offers a compatible clamping surface. Check pressure points, movement, and interference.
- Existing-hole systems reuse compatible factory mounting points. Matching hole spacing alone does not confirm that the point was designed for outrigger loads.
- Permanent brackets with removable arms leave small mounts installed while allowing the wider assembly to be removed for storage or transport.
Some through-bolted installations require access beneath the deck to hold nuts or install backing hardware. Expansion-style fasteners may be offered where the underside is inaccessible. Neither arrangement should be assumed structurally suitable merely because the hardware can be inserted and tightened.
Package architecture varies. On the manufacturer page reviewed September 7, 2026, the Scotty 302 package was listed with two inflatable pontoons, two removable 28-inch anodized-aluminum arms, four locking side-deck mounts, and two rod holders. Those components may be complete for one installation and unsuitable for another, so package completeness is not the same as kayak compatibility (Scotty 302 package details).
A SailboatsToGo product page reviewed the same day described a system in which most hardware removes with two pins while two brackets remain bolted to the deck. It listed adjustable float width and height plus 30-, 36-, 40-, and 45-inch crossbars. Statements about quick setup and reduced drag are seller claims, not comparative test results (SailboatsToGo configuration details).
There is no universal mounting location. Sources variously suggest front, near-center, behind-seat, and rear-deck placement. The appropriate position depends on where the kayak can safely accept hardware, where support is needed relative to the paddler, and whether the system interferes with paddle strokes, fishing, entry, controls, storage, or recovery.
Adjustment is equally contextual. Moving floats farther outward generally increases leverage but also widens the kayak. Lowering them into continuous contact can provide support sooner but may add resistance. Raising them may reduce continuous contact while allowing more initial heel. Follow the product instructions and make one adjustment at a time during calm-water checks close to shore.
Tradeoffs to evaluate before committing
Stabilizers address lateral support by introducing other variables:
- Added hydrodynamic drag
-
More surface exposed to wind
-
Additional weight
- Greater deployed beam
- More difficult carrying, roof-rack loading, storage, and launching
- Paddle contact with arms or floats
- Fishing-line snags around brackets and arms
The magnitude of these drawbacks cannot be predicted from float material or listing language alone. Seller statements sometimes claim limited drag, while comments collected on a commercially interested manufacturer’s page report mixed experiences, including both noticeable drag and line snags and little interference with raised or adjustable floats. These are conflicting anecdotes, not controlled comparisons (Wavewalk’s discussion of outrigger tradeoffs).
Recovery deserves particular attention. An outrigger may resist rotation when the kayak is inverted, and installed arms or crossbars may obstruct righting or re-entry. The frequency and severity of these problems are not established, so treat them as precautionary considerations to examine during controlled rescue practice.
Likewise, do not assume a quick-release mechanism will solve a recovery problem. Before relying on one, determine whether you can locate and operate it from the water in the configuration you actually use. That is a practical risk check, not proof that the release has been validated under emergency loads.
If speed, close-quarters maneuvering, surf or rough-water handling, frequent roof-rack transport, or straightforward self-rescue is a priority, weigh these costs carefully. Additional upright support does not establish that the complete kayak-and-outrigger setup is suitable for standing or choppy water.
Price and package examples: compare complete systems, not headlines
A float-only listing and a complete mounted system are different purchases. Get a quote for the parts needed by your actual kayak, then check availability and returns.
Build the actual purchase cost from this checklist:
- Base stabilizer or float package
- Kayak-specific mounts
- Accessory-track adapters
- Backing plates, washers, nuts, or expansion hardware
- Corrosion-resistant replacement fasteners
- Pump and valve adapter
- Patch or repair kit
- Carry bag
- Replacement floats, bladders, arms, pins, or clips
- Installation labor, if required
- Changes to roof-rack or storage arrangements
Check whether replacement parts are sold individually. A low initial price may be less attractive if damage to a valve, float, arm, or proprietary pin requires replacement of the entire system.
Prices, availability, ratings, badges, warranties, and package contents can change after the stated snapshot date. Recheck the current product page before buying. Without comparative testing of stability, drag, durability, mounting loads, and recovery, an overall product ranking would imply confidence the available evidence does not support.
Safe setup, practice, and maintenance checklist
Before every launch:
- Stay within the kayak manufacturer’s rated load limit.
- Distribute paddler and gear weight evenly.
- Wear an appropriate, properly fitted PFD.
- Inflate the floats as specified, where applicable.
- Inspect valves and check for leaks or softening.
- Check pins, clips, screws, arms, crossbars, brackets, tracks, and clamps.
- Confirm that every float and arm is positively secured.
- Look for cracking, looseness, movement, or visible deformation around mounts.
- Sweep the paddle fully on both sides to check clearance.
- Check fishing lines, pedals, steering, rudder, motor, anchor, and entry paths.
- Confirm that the floats are adjusted equally unless the instructions specify otherwise.
These precautions align with vendor guidance to stay within the boat’s stated load limit, wear a PFD, inspect installed hardware, distribute weight evenly, and begin on calm water. They are prudent checks rather than a validated universal installation protocol.
For the first launch, use calm water close to shore. Begin with seated forward paddling, stopping, backing, and turns. Then test controlled leaning in both directions and observe when each float engages. Change only one width or height setting at a time so you can identify what altered the handling.
Practice the recovery method appropriate to your kayak and abilities, whether that is self-rescue, assisted rescue, or a shore-based plan. A vendor that sells outriggers specifically warns that an equipped kayak can still capsize and may be difficult to right, and it emphasizes practicing rescue techniques before relying on the system (Angle Oar’s capsize and rescue discussion).
Before traveling farther from shore, assess whether the installed system interferes with righting, re-entry, movement around the hull, or emergency removal. Stabilizers may reduce tipping risk, but they do not replace judgment, paddling skills, a PFD, or rescue practice.
After saltwater exposure, rinse floats, arms, joints, brackets, and fasteners with fresh water. Dry the system completely before enclosed storage. Inspect inflatable floats for abrasion, punctures, valve leakage, and seam damage; inspect every system for corrosion, bent arms, loose hardware, worn pins, and movement around mounting holes. Follow the specific system’s cleaning and storage instructions.
For a DIY system, do not assume that a joint, adhesive, pipe, float, or deck attachment has a validated load capacity. Have the mounting and design assessed before occupied use. A casual float test does not establish that the parts can withstand paddling, waves or recovery loads.