
From Foot Power to Forward Motion: A Practical Guide to Pedal Kayaks
Fin and propeller drives differ in pedal motion, reverse, clearance and obstacle response. A separate rudder usually controls direction, not the pedals.
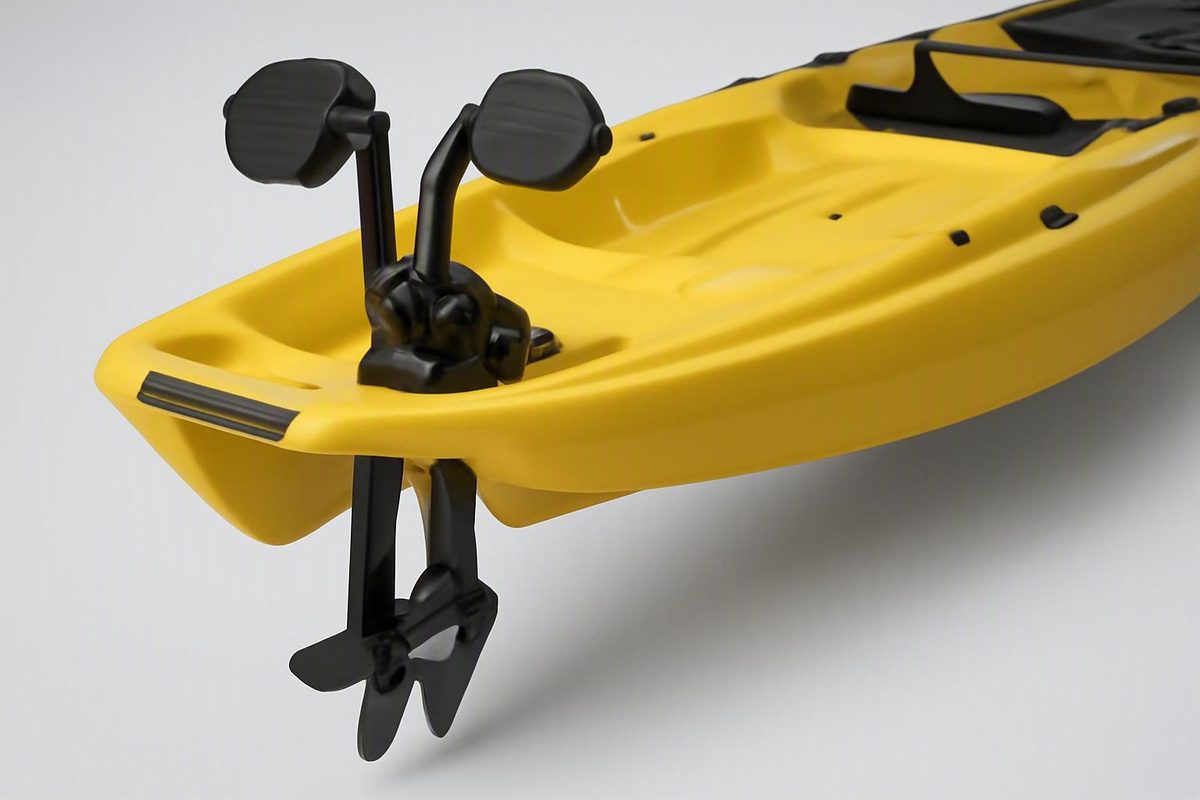
This guide synthesizes published operating instructions and equipment guidance. It does not replace the manual for a specific kayak or drive.
The short answer: how pedaling moves a kayak
A pedal kayak moves through four connected stages:
- The rider supplies power by pushing or rotating the pedals with the legs.
- The drive transfers that input through a linkage, gears, a shaft, or another model-specific mechanism.
- Submerged fins or a propeller move water and generate thrust.
- That thrust moves the hull forward—or backward if the drive supports reverse.
The two main drive categories reach the same broad result through different motions. Many fin drives use alternating, forward-and-back pedal strokes that swing two fins beneath the hull. Many propeller drives use continuous, bicycle-like pedal rotation transmitted to a submerged propeller. This distinction is also described in an archived overview of how pedal kayaks work.
Propulsion and steering are usually separate. The pedals create thrust, but a rudder at or near the stern normally changes direction. The rider moves that rudder with a hand lever, tiller, or another steering control. Turning or pressing the propulsion pedals does not ordinarily steer the kayak.
That is why hands-available propulsion is more accurate than “hands-free.” A rider may be able to keep pedaling while casting, taking a photograph, or handling equipment, but may still need a hand to steer, operate reverse, raise the drive, adjust a control, or avoid a hazard.
Mechanism map
Propulsion: Feet → pedals → linkage or transmission → oscillating fins or rotating propeller → thrust → hull movement Steering: Hand lever or tiller → cable or linkage → stern rudder → heading change
This arrangement does not establish that a pedal kayak will be faster, safer, quieter, more stable, more efficient, or less tiring than a paddle kayak. Those outcomes depend on the drive, hull, fit, rider, load, maintenance, conditions, and the paddle kayak used for comparison.
The main components and what each one does
Although details vary among brands and models, most pedal kayaks can be understood through a few functional parts:
- Pedals: The rider’s contact points for supplying leg power. They may move alternately or rotate in circles.
- Drive unit: The removable, deployable, retractable, or permanently mounted assembly that transfers pedal input below the hull.
- Fins or propeller: The underwater device that generates thrust.
- Rudder: A blade at or near the stern that changes the kayak’s direction.
- Steering lever or tiller: The rider-operated control connected to the rudder.
- Seat: The primary support and reference point for pedal reach.
- Pedal-reach or seat adjustment: The mechanism used to accommodate different leg lengths.
- Deployment and retention hardware: Pins, knobs, latches, trays, cords, or other parts that secure the drive and rudder in operating or stowed positions.
A propeller-drive transmission may contain gears and shafts. Depending on its design, it may also use bearings, chains, belts, or other serviceable parts. No single internal layout applies to every propeller drive. Even systems that use similar bicycle-style pedaling can transfer power differently.
The rudder is mechanically distinct from the propulsion unit. Moving the steering control turns the rudder blade left or right, changing the kayak’s heading. Steering cables or lines may run inside or along the hull, but their routing and adjustment vary by model.
Both the drive and rudder add underwater draft. A bare hull may float over water too shallow for a deployed fin, propeller, shaft, or rudder. That difference matters near beaches, ramps, rocks, logs, vegetation, oyster beds, and other submerged obstructions.
Some drives can be lifted into the cockpit opening. Others can be removed, tilted, retracted, or positioned so their fins lie close to the hull. These features should not be assumed: owners should follow the deployment and retraction procedure in the applicable manual.
A useful component illustration should show the functional relationship among the seat, pedals, drive, thrust device, steering control, and rudder. It should not depict one combination of gears, chains, shafts, or bearings as though it were universal.
How fin-drive pedal kayaks create thrust
Many fin drives use an alternating motion that feels more like stepping than cycling. As one pedal moves forward, the other moves back. The drive converts that repeated input into side-to-side movement of two fins beneath the hull.
As the fins sweep through the water, they interact with and redirect it. The repeated movement generates net thrust that propels the kayak. That explanation is intentionally broad: fin shape, flexibility, linkage geometry, range of motion, and operating angle differ among systems, so one detailed account of foil angle or thrust during every phase would not apply universally.
Hobie’s MirageDrive is a recognizable example, not a template for all fin drives. In the installation described by Viking EcoTours, alternating pedal movements swing fins beneath the kayak while a separate lever controls the stern rudder. The operator also describes adjustable pedals and seats, illustrating how propulsion, steering, and fit remain distinct functions in a specific MirageDrive installation.
Some fin drives include shallow-water features. On certain systems, moving one pedal forward places the fins close to the hull. Some designs may move or kick back after contacting an obstruction. Drives without those features may need to be raised or removed before entering shallow water.
Reverse also varies. A fin drive may use:
- A shift cable that changes fin orientation
- A lever or control that changes operating direction
- Manual repositioning of the fins
- Another model-specific mechanism
- No immediate reverse function
A retailer’s description of the MirageDrive 180 says that its shift cables pivot the fins between forward and reverse and that pushing one pedal forward places the fins against the hull. These should be treated as reported capabilities of that named product rather than general fin-drive features, and the owner should verify the procedure in the applicable Hobie documentation.
Fin-drive motion
Alternating pedal strokes: left pedal ↔ right pedal Mechanical linkage: pedal movement → side-to-side fin movement Result: repeated fin sweeps → forward thrust
This motion should be distinguished visually from the circular crank movement of a propeller drive. Both use the legs, but the rider’s movement and underwater mechanism differ.
Pedaling technique also depends on the drive. Smooth alternating movement is generally easier to control than striking the ends of the pedal travel, but appropriate stroke length and cadence depend on fit, conditions, and manufacturer instructions. Reduced pedal travel may keep the fins of certain systems closer to the hull in shallow water, but only where the drive is designed and documented for that technique.
How propeller-drive pedal kayaks work
A propeller drive usually starts with bicycle-like circular pedaling. The crank motion enters a transmission, which may use gears and a shaft to turn a propeller below the hull. As the propeller rotates, it moves water and produces thrust.
The exact transmission cannot be inferred merely by looking at the pedals. Some drives place gears near the crank and transfer rotation down a shaft; others use different internal arrangements. Their shared function is the conversion of circular pedal movement into propeller rotation.
Many propeller drives can reverse by pedaling backward. Reversing the crank reverses the propeller’s rotation and the direction of thrust. This is common, but it is not guaranteed on every model and should be confirmed through the manual or a direct demonstration.
The Lifetime Renegade provides a model-specific example. Its drive is secured above the hull for launching and then lowered and locked into operating position after the kayak reaches adequate water. Once deployed, forward or backward pedaling provides propulsion, while a tiller on the rider’s left controls the rudder. Lifetime also instructs the rider to adjust the seat so the knee remains slightly bent at extension in its Renegade operating video.
A propeller and its shaft occupy space below the hull. Weeds, moss, loose fishing line, and other fibrous debris may obstruct them. Rocks, logs, ramps, sandbars, and the bottom can also contact exposed parts.
There is no universal minimum operating depth. Required clearance depends on how far the drive and rudder project beneath the hull, whether the drive tilts, the load aboard, wave action, deployment movement, and the character of the bottom.
Propeller-drive motion
Propulsion: Feet → circular pedals and crank → gears or model-specific transmission → shaft → rotating propeller → thrust Steering: Tiller or lever → cable or linkage → stern rudder → heading change
Nothing in this mechanism proves that a propeller drive is universally faster or more efficient than a fin drive. Overall performance also depends on gearing, propeller design, mechanical condition, hull resistance, cadence, load, wind, waves, and current.
Steering, reversing, stopping, and close-quarters control
The pedals normally propel the kayak; they do not steer it. To turn, the rider moves the steering lever or tiller, which turns the stern rudder. Control names and positions differ, but the usual division remains the same: a drive below the cockpit provides thrust, while a rudder behind the hull controls heading.
Hull shape, length, rocker, rudder size, load distribution, wind, waves, and current also affect the result.
Riders should account for that delay when approaching a dock, another boat, a shoreline, or an obstacle.
Reverse must be learned on the actual drive:
- Many propeller systems reverse when the rider backpedals.
- Some fin systems use a shift cable or lever.
- Other fin systems require manual repositioning.
- Some drives do not provide immediate reverse.
The retailer description of the MirageDrive 180, for example, says that pulling a shift cable pivots its fins to change thrust direction. That does not mean backward pedal movement reverses every fin drive.
Even where reverse is available, a paddle remains useful in close quarters.
Before depending on the system in wind, current, traffic, or confined water, practice in calm, open water:
- Starting from rest
- Making gradual and tighter turns
- Stopping pedaling and estimating coast distance
- Entering and leaving reverse
- Raising and lowering the drive
- Deploying and retracting the rudder
- Switching promptly to the paddle
Manufacturer guidance for new owners similarly recommends learning drive operation, stopping, maneuvering, deployment, and model-dependent reverse in calm water before routine use. It also directs owners to follow the instructions for their specific pedal kayak.
A safe launch-to-landing operating sequence
No single launch procedure fits every drive. The following workflow must be adapted to the kayak’s manual, launch site, weather, water temperature, traffic, load, and the rider’s ability.
1. Inspect and prepare on land
Check the hull, seat, drive mounts, rudder, steering control, and retention hardware before entering the water. Confirm that the seat and pedals are adjusted, distribute the load evenly, and secure equipment so it cannot shift.
Wear a life jacket and carry a paddle where it can be reached from the seat. Water conditions, cold water, load limits, and individual ability remain relevant regardless of the propulsion system; Kayaks Hub’s water-safety notice also directs boaters to wear a life jacket.
2. Keep vulnerable parts raised during launch
Keep the drive and rudder raised, tilted, flattened, or removed through the launch zone unless the applicable instructions specify otherwise. Do not move over a ramp, beach, or bottom with exposed underwater hardware in a position where it can make contact.
Use an entry method appropriate to the site and your ability, and secure loose gear before moving away from shore. Model-specific manufacturer instructions should govern how the drive is retained while raised.
3. Paddle to the required depth
Paddle away from shore until reaching the depth specified for the particular kayak and drive. Published figures differ because they refer to different equipment or different kinds of guidance:
- The archived Kayaks Hub overview gives a general recommendation of at least 12 inches of water for protecting underwater components (archived guidance).
- A FishTalk author reports that his own propeller-drive kayak requires a 13-inch draft (equipment-specific comparison).
- Lifetime instructs Renegade users to paddle until reaching two feet of water before deploying that model’s drive (Renegade instructions).
These numbers are not interchangeable. Allow additional room where waves, rocks, vegetation, or an uneven bottom could reduce effective clearance.
4. Deploy and secure the drive and rudder
Align, lower, latch, or insert the drive exactly as its instructions require. Confirm that locking knobs, pins, trays, or retainers are engaged. Deploy the rudder and verify that the steering control moves it correctly before building speed.
Begin with light pedal pressure. Stop if the drive scrapes, binds, vibrates unexpectedly, or develops unusual resistance, and inspect it using the procedure in the manual.
5. Manage changing water depth
Before entering shallow, rocky, heavily vegetated, or debris-filled water, stop using the drive. Depending on the model, the documented response may be to:
- Flatten the fins against the hull
- Retract or tilt the drive
- Lift it into a stowed position
- Remove it from the drive well
- Shorten the pedal stroke
Do not assume a kick-up feature protects the entire system. The rudder or another drive component may remain exposed. Guidance for pedal-drive owners recommends raising or repositioning underwater components in shallow water and carrying a paddle for areas where the drive cannot be used safely.
If a drive jams, stop applying pedal force. Stabilize the kayak as conditions allow, switch to the paddle, and follow the manufacturer’s obstruction-clearing procedure. Do not improvise an afloat repair that requires unstable reaching or entering hazardous water; manufacturer guidance emphasizes learning the drive’s operation and model-specific procedures before relying on it.
6. Treat rivers as a separate judgment
A pedal-kayak hull may be usable on a river even when its deployed drive is unsuitable for a particular section. Current can reduce reaction time, while rocks, ledges, branches, rapids, and shallow gravel may obstruct or strike the drive and rudder. Retailer guidance likewise warns that current, rocks, rapids, and other obstacles can limit pedal-system suitability on particular river sections.
The useful question is not simply, “Can a pedal kayak go on a river?” It is, “Can this hull, drive, rudder, rider, and backup plan handle this section under today’s conditions?”
7. Prepare for landing before reaching shore
While sufficient water remains beneath the hull, stop pedaling and raise or secure the drive according to its instructions. Raise the rudder before it can contact the bottom, then use the paddle for the final approach.
A paddle is therefore essential backup equipment rather than an optional accessory. It provides propulsion for launching, landing, very shallow water, close maneuvering, drive failure, steering problems, vegetation, and emergencies.
Comfort, fit, and what hands-available propulsion is good for
At the farthest point in the stroke, the knee should generally remain slightly bent instead of locking straight.
Adjustment may come from moving the seat, moving the pedal assembly, changing a numbered pedal setting, adjusting straps, or using a combination of those methods. The available range differs among kayaks, so the word “adjustable” does not guarantee that a system will fit every rider.
Once properly fitted, pedal propulsion can leave the hands more available for:
- Casting and retrieving a lure
- Reeling or landing a fish
- Operating electronics
- Taking photographs
- Observing wildlife through binoculars
- Handling tackle or other gear
- Checking a chart when conditions permit
“More available” remains the important qualification. The rider is still responsible for steering, maintaining a lookout, monitoring water depth and traffic, and preparing to stop or raise the drive.
Comfort cannot be promised from propulsion type alone. Cadence, seat support, pedal spacing, leg length, hip position, mobility, load, water conditions, and drive resistance all affect the experience. Riders with knee, hip, leg, or mobility limitations should test entry, seating, pedal reach, steering, reverse, and drive deployment instead of assuming that leg propulsion will be suitable. Weight, debris exposure, leg reach, physical mobility, and transport demands are among the limitations raised in an independent pedal-kayak suitability discussion.
Stability should be evaluated separately. A pedal mechanism does not make a kayak inherently stable. Hull width and shape, load distribution, seating height, rider balance, and conditions have a more direct influence. Even a wide fishing kayak can become difficult to manage if it is overloaded, poorly trimmed, or used in unsuitable conditions.
Fin versus propeller—and when a paddle kayak may fit better
Neither drive type is the universal winner. The useful question is which mechanism fits the intended water, activities, transport plan, budget, and maintenance tolerance.
| Consideration | Fin drive | Propeller drive |
|---|---|---|
| Pedal motion | Commonly alternating forward-and-back or stepping strokes | Commonly circular, bicycle-like rotation |
| Underwater thrust device | Two oscillating fins | Rotating propeller, often connected through a shaft |
| Common reverse method | Shift control, changed fin orientation, manual repositioning, or another model-specific method | Often backward pedaling, where supported |
| Shallow-water response | Some models can flatten fins or incorporate kick-up behavior | Often tilted, lifted, or removed before clearance becomes insufficient |
| Debris exposure | Fins and linkages may catch vegetation or strike obstructions | Propeller and shaft may collect weeds, moss, or line and suffer impacts |
| Drive handling | May be removable, retractable, flattening, or mounted in another model-specific way | May be removable, tilting, deployable, or mounted in another model-specific way |
| Important exceptions | Not every fin drive flattens, kicks up, or reverses immediately | Not every propeller drive reverses by backpedaling or requires the same depth |
Fin systems may be attractive where a particular model can flatten its fins or respond to certain contacts. But “fin drive” alone guarantees neither feature, and fins or linkages can still encounter vegetation and obstructions.
Propeller systems often provide direct-feeling reverse through backpedaling. Their propellers and shafts can require meaningful clearance and remain exposed to impact or entanglement. The practical difference depends on installation depth, protection, deployment geometry, and bottom conditions.
Selection should account for:
- Typical water depth and tidal change
- Vegetation, fishing line, rocks, timber, and other obstacles
- How frequently reverse will be used
- Expected trip length and exposure
- Fishing or photography requirements
- Need for lateral or close-quarters movement
- Vehicle, trailer, storage, and lifting capacity
- Purchase and replacement-part budget
- Willingness to clean and service moving hardware
Pedal hardware can add weight, cost, underwater draft, maintenance, transport difficulty, and vulnerable components compared with a simpler paddle kayak. The hull may also be built around fishing storage, a higher seat, or a wider deck, affecting weight and paddling ergonomics independently of the drive.
A paddle kayak may fit better for very shallow water, narrow channels, frequent beaching, repeated lateral maneuvering, lighter transport, or simpler ownership.
Tracking and maneuverability cannot be predicted from “fin versus propeller” alone.
When possible, test the complete ownership process before buying:
- Sit in the adjusted seat for more than a few minutes.
- Confirm pedal reach without locking the knees.
- Operate the steering control.
- Try forward propulsion, stopping, turning, and reverse.
- Raise and lower the drive from the seated position.
- Lift the hull and separate drive unit.
- Load them onto the intended vehicle or trailer.
- Confirm that the kayak fits the available storage space.
- Identify replacement parts and routine service requirements.
Buying guidance comparing the two propulsion methods similarly notes that paddles retain advantages in very shallow water and lateral maneuvering, while pedal drives introduce additional hardware and maintenance considerations (drive comparison).
Maintenance and common drive problems
A pedal drive operates underwater, where salt, sand, silt, vegetation, and fishing line can reach exposed or moving parts. A short post-trip routine helps identify debris, looseness, wear, or damage before the next launch.
Post-trip routine
- Remove visible debris. Clear weeds, moss, line, leaves, and twigs without forcing or bending components.
- Inspect the thrust device. Look for bent, torn, cracked, loose, or abraded fins, propeller blades, shafts, guards, and attachment points.
- Check the rudder. Confirm that it raises, lowers, and turns through its intended range.
- Inspect steering components. Where accessible, look for loose, corroded, kinked, or frayed cables and damaged attachment points.
- Check retention hardware. Verify that knobs, pins, bolts, clips, and latches remain secure.
- Rinse the hull and drive. Pay particular attention after saltwater use.
- Drain and dry removable parts.
- Store components as directed. Support the drive and fins in the position specified by the manufacturer.
Freshwater rinsing is especially important after saltwater exposure. Rinse around the fins or propeller, shaft, steering cables, fasteners, pedal cranks, pivot points, and other exposed moving or metal parts.
Common sources of trouble include:
- Weeds and moss
- Monofilament or braided fishing line
- Branches and leaves
- Sand, silt, and mud
- Salt deposits
- Loose fasteners
- Worn moving parts
- Bent or damaged fins
- Damaged propeller blades
- Obstructed shafts
- Loose, corroded, or frayed steering cables
A propeller transmission may contain serviceable gears, shafts, bearings, belts, or chains. That list is not universal, and neither are lubrication points, part-replacement intervals, or disassembly procedures. Maintenance guidance for propeller systems identifies freshwater rinsing, shaft and propeller inspection, tangled line, loose fasteners, and steering-cable wear as concerns while directing owners to follow model-specific servicing procedures.
Do not improvise lubrication, cable tension, transmission disassembly, or replacement intervals. Use only the products and procedures specified for the exact drive revision, and obtain qualified service when a task exceeds the owner-maintenance instructions.
Pre-launch checklist
Before each trip, verify that:
- The drive is correctly installed and retained
- The fins or propeller move without obvious binding
- The rudder deploys and retracts
- The steering control moves the rudder correctly
- Pedal reach and straps are adjusted
- The seat is secure
- Gear is balanced and restrained
- The manufacturer’s load limit is respected
- A reachable paddle is aboard
- A life jacket is being worn
- The model-specific obstruction procedure is understood
If the drive jams afloat, stop pedaling and switch to the paddle. Do not apply additional leg force to an unknown obstruction. Secure the kayak’s position as conditions permit and follow the manufacturer’s procedure. If the obstruction cannot be addressed without unstable reaching or entering hazardous water, return to a suitable landing or seek assistance.
Conclusion
A pedal kayak is best understood as four linked systems: the rider supplies power, the drive transfers it, fins or a propeller generate underwater thrust, and a separate rudder usually controls direction.
Fin and propeller drives differ most visibly in pedal motion, reverse method, clearance, deployment, and response to obstacles. Many of the features that matter in practice—including instant reverse, flattening fins, kick-up behavior, and drive retraction—remain model-specific.
Choose around the water you actually use, the fit you can verify, the weight you can transport, the reverse control you need, and the exposed hardware you are prepared to maintain. Whatever the drive type, follow its manual, wear a life jacket, and carry a paddle.
Frequently asked questions
Do pedal kayaks still need a paddle?
Yes. A paddle provides propulsion for launching, landing, very shallow water, lateral movement, tight maneuvering, drive or steering failure, and emergencies. Keep it secured but reachable from the seat.
Can every pedal kayak go backward?
No. Reverse is model-dependent. Many propeller drives reverse by backpedaling, while fin drives may use a shift cable, lever, manual fin repositioning, or another mechanism. Some drives do not provide immediate reverse.
How deep does the water need to be for a pedal kayak?
There is no universal depth. Required clearance depends on the drive, rudder, deployment movement, load, wave action, and bottom. Use the requirement in the manual for the particular kayak and allow additional margin around rocks, vegetation, and uneven bottoms.
Do the pedals steer a pedal kayak?
Usually not. The pedals generate thrust, while a separate hand lever or tiller controls a stern rudder. A paddle may still be more useful for immediate sideways movement or rotation in confined spaces.
What maintenance does a pedal kayak require after saltwater use?
Rinse the kayak, removable drive, fins or propeller, shaft, rudder, cables, fasteners, and exposed moving parts with fresh water. Remove visible line and vegetation, inspect for looseness, wear, corrosion, or damage, allow components to dry, and store them as directed. Follow the exact manual for lubrication, disassembly, replacement intervals, and internal servicing.