
Your Boat’s Sacrificial Anode May Not Actually Be Zinc
A marine “zinc” may be zinc, aluminum or magnesium. Use the equipment manual to select the alloy and part, then check wear, contact and coatings.
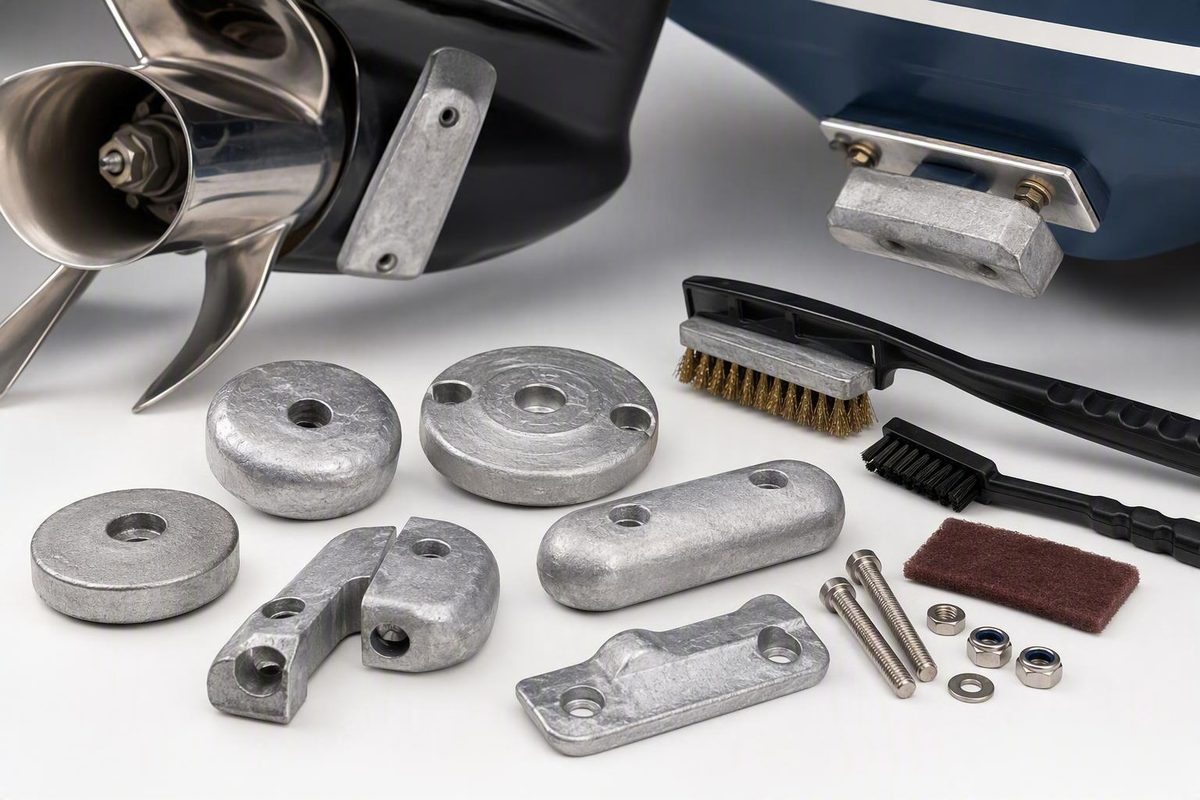
A marine “zinc” is a replaceable sacrificial anode that corrodes to help protect electrically connected underwater hardware. Despite the shorthand, the correct anode may be zinc, aluminum or magnesium. Choose the alloy and part from the equipment manual—not by color, price or appearance—then keep the anode unpainted, securely connected and exposed to the water. Replace it at the wear limit specified for your equipment.
The short answer: what a zinc anode does
A sacrificial anode is made from a relatively active metal intended to oxidize before the more valuable metal connected to it. Boaters commonly call these components “zincs,” even when their actual alloy is aluminum or magnesium.
The underlying problem is galvanic corrosion. When dissimilar metals are electrically connected and immersed in conductive water, an electrochemical reaction can consume the more vulnerable metal. An aluminum gearcase paired with a stainless-steel propeller is one example identified in Mercury’s corrosion guidance. A sacrificial anode gives that reaction a deliberately expendable target.
Depending on the boat and propulsion system, anodes may help protect:
- Outboard gearcases and mounting hardware
- Sterndrives
- Propellers and shafts
- Struts and rudders
- Trim components
- Other electrically connected submerged metal
Protection requires two working paths:
- An electrical path: The anode must be electrically connected to the component or protection system it serves.
- An ionic path: The anode and protected hardware must be exposed to the surrounding water, which acts as the electrolyte.
Break either path and protection can fail. These are basic requirements of a galvanic-anode system, not optional installation details.
Choose the alloy by equipment and water type—not by the word “zinc”
Water type matters, but it is not the only variable. Alloy selection also depends on the engine, drive, hull system and manufacturer’s corrosion-protection design. That makes “zinc for every saltwater boat” too broad a rule for ordering parts.
For its own products, Volvo Penta specifies these water-dependent choices:
| Water type | Volvo Penta recommendation | Important limitation | Next action |
|---|---|---|---|
| Salt water | Aluminum | Use zinc if an aluminum option is not provided for that product | Confirm the model-specific alloy and part number |
| Brackish water | Aluminum | Use zinc if an aluminum option is not provided for that product | Check the applicable engine or drive manual |
| Fresh water | Magnesium | Zinc and aluminum may develop passivating films and stop working properly | Confirm magnesium is specified for the equipment |
Volvo Penta warns that magnesium can be consumed extremely quickly and may cause overprotection in salt or brackish water. Conversely, it says zinc and aluminum can develop passivating surface films in fresh water, particularly at low anode current densities, reducing or stopping their protective action.
These are Volvo Penta recommendations for Volvo Penta products, not universal instructions for every outboard, sterndrive or hull. Another manufacturer may specify a different alloy for its materials and corrosion-control system.
Use this sequence:
- Find the manual for the exact engine, drive or protected component.
- Confirm the specified alloy.
- Confirm the manufacturer part number or approved replacement.
- Only then compare dimensions, bolt spacing and mounting style.
If the boat moves between water types, do not improvise by mixing alloys or choosing whichever package claims the broadest coverage. Ask the equipment maker or a qualified marine technician which approved configuration applies.
Find the correct replacement before ordering
Start with the boat, engine or drive manual. It should identify factory anode locations and may provide the required alloy, part number and replacement procedure.
Use this worksheet while checking the manual and comparing listings:
| Fitment field | What to record |
|---|---|
| Equipment | Make, model, model year and serial number |
| Installation location | Gearcase, trim ram, transom bracket, shaft, hull, rudder or other location |
| Manufacturer part number | Exact specified or superseding number |
| Specified alloy | Zinc, aluminum or magnesium |
| Body dimensions | Length, width, thickness and relevant diameter |
| Weight or mass | Original specified value, where available |
| Bolt spacing | Center-to-center measurement and hole size |
| Mounting style | Bolt-on, screw-on, clamp, collar, strap, insert or other design |
| Strap or insert | Material and configuration |
| Quantity | Number required at the location and across the equipment |
Physical fit is necessary, but it does not prove electrochemical suitability. Anodes are sold in many weights, shapes, inserts and mounting configurations.
Consider the Z-4 only as an example of how to read a catalog listing. It has a steel strap extending beyond both ends, with tabs the seller says can be drilled. However, the listing provides no boat-specific compatibility, water-type selection or required anode mass for a particular installation. Those specifications identify the listed Z-4; they do not establish where it belongs.
This general guide cannot approve drilling, changing anode mass or substituting alloys to make a catalog part fit. If the manual does not authorize the proposed installation, obtain model-specific guidance from the equipment manufacturer or a qualified professional.
Use this anode inspection checklist
Inspect the anode, its mounting interface and the nearby hardware as one system.
- [ ] Locate every factory anode. Use the manual rather than stopping after finding the most visible one.
- [ ] Confirm each anode is present and secure. Looseness can compromise the intended electrical connection.
- [ ] Estimate material loss. Compare the part with a new anode, its original profile or the manual’s replacement criteria.
- [ ] Look for paint or coating. A sacrificial anode must be directly exposed to water and must not be painted.
- [ ] Check for heavy contamination. Scum, deposits or passivating films may reduce effectiveness.
- [ ] Inspect the mounting interface. Look for paint, sealant, corrosion or looseness where electrical contact is required.
- [ ] Examine nearby metal. Check for pitting, deposits, damaged coatings and unusual deterioration.
- [ ] Check placement. Make sure the anode does not interfere with water flow through the propeller area.
Mercury says even a thin film of scum can reduce anode effectiveness and may be removed with a stiff brush. It identifies pitting, white powder or deposits, and paint blistering below the waterline as possible signs of galvanic corrosion. Follow the equipment manual rather than moving to aggressive scraping or abrasive cleaning that has not been approved.
There is no supported single inspection calendar for every boat in this guide. Exposure differs among trailer-kept freshwater boats, moored saltwater pontoons and vessels connected to shore power. Mercury recommends frequent inspection, especially in saltwater, but the applicable maintenance schedule remains the controlling instruction.
Replace it at about half consumed—unless the manual says sooner
For applicable Volvo Penta equipment, the company advises replacement when an anode has eroded to half its original size. That instruction appears in its anode inspection and replacement guidance linked above.
Mercury likewise recommends replacing applicable engine anodes when they are 50% consumed, while directing owners to the relevant manual for locations and model-specific procedures. Mercury’s engine-anode guidance explains that protection declines as the anodes dissolve.
Treat “about half consumed” as a manufacturer-backed working rule for those applicable products—not as permission to override another manual. Replace sooner if the instructions for your engine, drive or boat require it.
Do not wait until the anode disappears. A depleted or missing engine anode can leave the lower unit, propeller and other connected hardware more vulnerable. At the other extreme, an untouched anode is not automatically healthy; it may not be participating in the protection system.
A universal “replace every year” rule is also too crude. Calendar time alone does not account for:
- Time spent in the water
- Fresh, brackish or saltwater operation
- Water temperature and conductivity
- Shore-power exposure
- Anode alloy and size
- Coating condition
- Electrical contact
- Model-specific design
Condition-based inspection and the manufacturer’s instructions are better guides. Use the prescribed part, mounting hardware, surface preparation and torque values from the applicable manual rather than transferring procedures from equipment that merely looks similar.
Troubleshoot what the wear pattern is telling you
Anode wear is diagnostic information. “Still looks new” can be as concerning as “disappeared quickly.”
| Observation | Possible explanation | Safe next step |
|---|---|---|
| No visible wear | Paint, contamination, passivation, wrong alloy or lost electrical contact | Confirm the alloy and part number; inspect water exposure and the specified mounting interface |
| Very rapid wear | Warm or highly conductive water, heavy galvanic activity, shore-power exposure or a wider electrical problem | Replace at the specified limit and arrange further investigation |
| Nearby corrosion despite an intact anode | Coated or passive anode, poor contact, wrong alloy or another required anode missing | Check every factory location against the manual |
| Loose anode | Inadequate mounting or compromised contact | Follow the applicable manual to correct the installation |
| Missing anode | Detached, omitted or completely consumed part | Identify and install the specified replacement; inspect adjacent metal |
| Uneven wear | Different exposure, contact, loading or a localized problem | Verify each part and location; seek diagnosis if the pattern persists |
Mercury says warmer or more conductive water can increase galvanic-corrosion activity. Its guidance also identifies saltwater as a condition requiring particular attention, while its engine-anode material notes shore-power connection as another concern.
A pristine anode beside corroding hardware should not be congratulated for lasting well. It may be electrically isolated, painted, contaminated, passivated or made from an unsuitable alloy.
Repeated rapid depletion should not be handled by blindly installing another generic zinc. Continuing corrosion or unexpectedly fast loss warrants investigation by a qualified marine technician or marine electrician. This article does not establish a continuity-resistance value or a remote procedure for diagnosing bonding faults, DC leakage, shore-power equipment or marina wiring; use the applicable manufacturer procedure and vessel-specific testing.
A five-minute pre-purchase and maintenance decision path
Use this sequence before buying or replacing an anode:
- Identify the protected equipment. Record the boat, engine, drive and component information.
- Check the applicable manual. Find every factory anode and the model-specific maintenance procedure.
- Establish the operating water type. Note whether the boat normally uses fresh, brackish or salt water and whether that changes seasonally.
- Confirm the alloy and part number. Treat these as controlling information.
- Verify dimensions and mounting pattern. Check body size, mass, bolt spacing, insert or strap, mounting style and quantity.
- Inspect contact and water exposure. The anode must be secure, unpainted, exposed to water and connected as the manufacturer intended.
- Replace at the specified threshold. Follow the exact manual; the roughly half-consumed rule applies only where the equipment maker endorses it.
Stop when a proposed job requires an unauthorized alloy substitution, extra anodes, altered bonding, changed anode mass or drilled mounting hardware. Those changes fall outside this general guide and require approval from the equipment maker or a qualified professional.
Price and inventory are not compatibility criteria. A cheaper in-stock part can have the wrong alloy, insert, mass or electrical behavior even when its holes line up.
It does not mean an ordinary unpowered kayak automatically needs a sacrificial anode.